
 NEWS List
Step-by-Step Guide: Using a Fiberglass Duct Rodder for Underground Cable Pulling
1. Pre-Work Preparation: Duct Inspection, Tool Check and Safety Precautions
The quality of the cable pull is largely determined before the fiberglass rod enters the conduit.
A few minutes of preparation can prevent much longer delays later.
1.1 Inspect the Underground Duct
Before feeding the rod, inspect the entire accessible route.
Check for:
Blocked conduit entrances
Mud, sand or standing water
Damaged duct ends
Sharp edges
Collapsed or deformed conduit
Existing cables
Excessive bends
Unknown obstructions
Damaged innerduct
Unusually tight transitions between ducts and manholes
If the conduit has been installed for a long time, do not assume that its internal condition matches the original construction drawings.
Where practical, verify the route using existing records, duct inspection equipment, a suitable test mandrel, or a pilot rod.
OSHA identifies bends and small conduit diameters as factors that can increase pulling resistance.
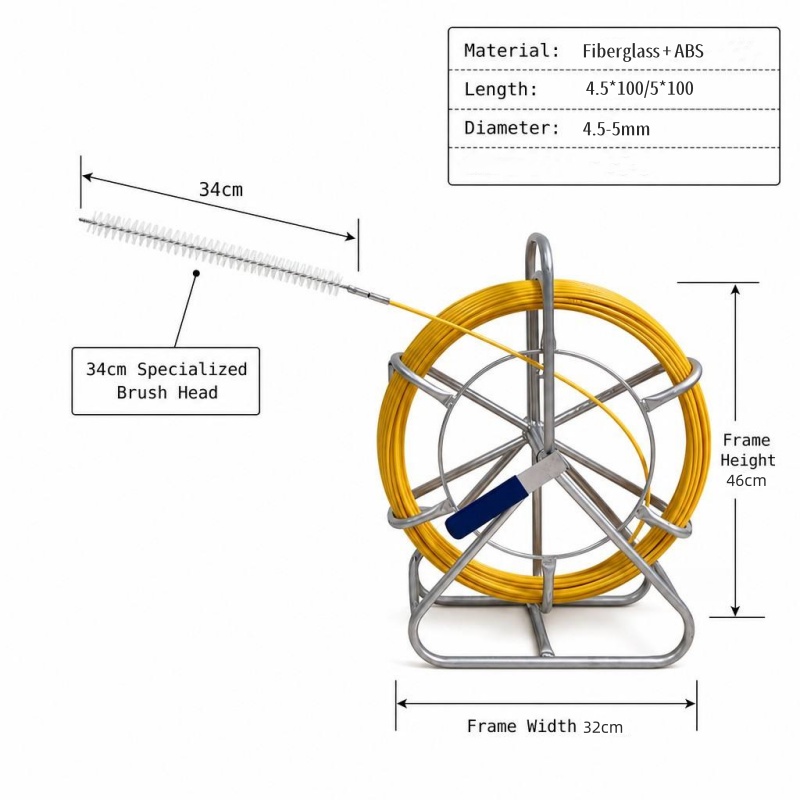
1.2 Check the Fiberglass Duct Rodder
Inspect the rod before use.
Look for:
Cracks
Splits
Severe scratches
Flattened sections
Damaged protective coating
Loose fittings
Damaged rod joints
Bent guide heads
Damaged reel frame
Brake or locking problems
Never assume that a damaged fiberglass rod is safe because fiberglass is normally strong.
If a section has visible structural damage, replace it according to the manufacturer's inspection procedure.
1.3 Check the Pulling Accessories
Prepare the accessories before starting.
Typical equipment includes:
Fiberglass duct rodder
Rod guide head
Pulling rope
Cable pulling grip
Pulling eye
Ball-bearing swivel
Appropriate pulling lubricant
Cable reel stand or rollers
Communication devices
Gloves and required PPE
Duct entrance protection
Cable tension monitoring equipment when required
For fiber-optic installations, a pulling grip should transfer the pulling force to the cable's intended strength members rather than simply gripping the cable jacket. Corning recommends using an appropriate pulling grip and a ball-bearing swivel during conduit pulls.
1.4 Establish a Safe Work Area
Underground cable work may involve traffic, electrical hazards, open manholes, confined spaces, heavy cable reels and lifting equipment.
Before beginning:
Establish traffic control where required.
Barricade open manholes.
Keep unauthorized personnel away.
Confirm communication between workers.
Check the condition of lifting equipment.
Keep workers clear of uncontrolled pulling lines.
Follow applicable confined-space procedures before entering a manhole.
Identify energized cables and other underground hazards.
OSHA's underground electrical-installation requirements include reliable communication among workers involved in the job and specific requirements for duct-rod operations. OSHA also requires workers to use appropriate access equipment when entering or exiting sufficiently deep manholes or vaults.
A particularly important principle is:
Do not treat a manhole as simply another work area.
If entry is required, the applicable confined-space and electrical-safety procedures must be followed.
2. Step 1: Align the Rodder Reel and Straighten the Feeding Path
Once the work area is ready, position the fiberglass duct rodder.
The reel should be aligned as closely as practical with the duct entrance.
Why Reel Alignment Matters
Poor alignment can cause the rod to:
Rub against the duct edge
Bend unnecessarily
Develop lateral loading
Feed unevenly
Twist around the reel
Become difficult to control
Position the reel so that the rod enters the conduit in a smooth, natural direction.
Recommended setup:
Rodder reel → guide head → duct entrance → underground conduit
Avoid placing the reel at a sharp angle to the conduit.
Protect the Duct Entrance
A sharp concrete, metal or damaged plastic edge can scrape the rod or cable.
Use an appropriate:
Duct bell
Roller
Guide
Bushing
Protective sleeve
to create a smoother transition.
The same principle is important when the cable itself is pulled later. Corning recommends eliminating sharp edges at conduit entrances and pull boxes through appropriate bushings, box-end connectors or flexduct.
Straighten the Initial Feeding Path
Before pushing the rod:
1.Unlock the reel.
2.Pull out a short section of rod.
3.Align it with the conduit entrance.
4.Confirm that the guide head is centered.
5.Make sure the rod is not twisted around the reel.
6.Begin feeding gradually.
Do not start by forcing the rod aggressively into the duct.
The first few meters should be used to confirm that the rod and conduit are properly aligned.
3. Step 2: Feed the Fiberglass Rod Smoothly Through the Underground Conduit
Now begin feeding the rod.
The correct technique is steady forward pressure rather than sudden force.
Push—Pause—Push
For normal underground duct work, a useful rhythm is:
Push → feel resistance → pause → adjust → continue
This gives the installer feedback from the rod.
If the rod moves smoothly, continue.
If resistance suddenly increases, stop and investigate rather than immediately increasing force.
Avoid Excessive Bending
Fiberglass rods are designed to flex, but every model has a specified minimum bending radius.
A thicker rod does not necessarily mean a better rod for every route.
A large rod can become difficult to navigate through tight bends.
The correct rod must therefore match:
Duct diameter
Bend radius
Route length
Rod stiffness
Rod manufacturer's specifications
Feed Through Bends Carefully
When the rod reaches a bend, maintain controlled pressure.
Do not repeatedly hammer or sharply flex the rod.
If resistance increases significantly:
1.Stop pushing.
2.Pull back slightly.
3.Rotate or reposition the rod if the manufacturer permits this technique.
4.Check the duct condition.
5.Apply an appropriate lubricant if suitable for the application.
6.Continue only when the obstruction or excessive friction has been addressed.
OSHA notes that bends in conduit create restriction points and increase the force required during cable pulling.
Do Not Use the Rod as a Jam-Clearing Tool
One common mistake is to continue pushing harder when the rod stops.
This can result in:
Rod deformation
Broken rod sections
Damaged guide heads
Damaged conduit
A rod becoming permanently stuck
If the rod suddenly stops at a repeatable location, treat that as route information, not simply resistance to overcome.
It may indicate:
A tight bend
A damaged duct
Debris
Water or mud
An existing cable
A collapsed section
An incorrectly aligned duct transition
4. Step 3: Connect the Cable Snake Head to the Target Cable Securely
Once the fiberglass rod reaches the target end of the conduit, it becomes the bridge between the duct and the cable.
In many installations, the rod first pulls a pulling rope, and the pulling rope is then used to install the final cable.
This is particularly useful for long or demanding cable pulls.
OSHA describes underground rodding as a method for threading the cable-pulling rope through the conduit before the cable is pulled.
Connect the Pulling Rope
A typical sequence is:
Fiberglass rod → pulling rope → swivel → cable pulling grip → cable
The exact configuration depends on the cable and manufacturer's instructions.
Use a pulling grip designed for the cable being installed.
Do not improvise a connection by tying a rope directly around a fiber-optic cable jacket.
Use a Swivel for Fiber-Optic Cable
A swivel is especially important for fiber-optic cable.
Why?
Pulling tension can cause the cable and pulling line to rotate.
If that twisting force is transferred into the cable, the fibers or cable structure may be stressed.
The Fiber Optic Association recommends using a swivel pulling eye to prevent pulling tension from transmitting twisting forces to the cable.
Corning likewise recommends connecting the pulling eye to an appropriate ball-bearing swivel and pull line.
Verify the Connection Before Pulling
Before applying pulling force, check:
Pulling grip is correctly installed
Strength members are properly engaged
Swivel rotates freely
Connection is fully secured
Cable jacket is not crushed
Cable manufacturer's maximum pulling tension is known
Cable bend radius requirements are understood
This is the last easy opportunity to catch a connection problem.
Once the cable enters the underground duct, correcting a poor connection becomes much more difficult.
5. Step 4: Pull Cable Steadily With Controlled Tension to Avoid Jams
After the cable connection is complete, begin the cable pull.
The most important principle is:
Pull smoothly, not violently.
Cable installation is not a competition to see how quickly the cable can be pulled.
The objective is to maintain a controlled installation tension within the cable manufacturer's limits.
Maintain Communication
For a two-ended operation, workers should maintain reliable communication.
A typical arrangement may include:
Cable reel operator ↔ pulling operator ↔ intermediate workers
If someone observes:
Cable snagging
Excessive tension
Cable deformation
Pulling grip slippage
Unexpected movement
Obstruction
Equipment failure
the pulling operation should stop immediately.
OSHA specifically requires reliable communications among employees involved in certain underground and cable-pulling operations.
Control Pulling Tension
For fiber-optic cable, never determine the safe pulling force simply from the rod's rated strength.
The cable manufacturer's maximum installation tension takes priority.
Corning warns that fiber-optic cable can be damaged if its specified maximum tensile force is exceeded and recommends tension monitoring for longer pulls.
For demanding installations, consider:
Dynamometer
In-line tension meter
Calibrated winch
Breakaway swivel/link where appropriate
Mechanical pulling equipment with tension control
Use Lubricant Where Appropriate
Lubrication can significantly reduce friction during cable installation.
OSHA recommends lubricating wire as it enters conduits to reduce friction and pulling force.
For fiber-optic cable, use only a lubricant compatible with the cable jacket and installation environment.
Corning recommends lubricants for cable pulls and notes that compatibility between the cable sheath and pulling lubricant must be considered.
Do not assume that any industrial lubricant is suitable for a communication cable.
Avoid Sudden Starts and Stops
Sudden acceleration can create a temporary tension spike.
Instead:
1.Start slowly.
2.Confirm the cable is moving freely.
3.Increase speed gradually if appropriate.
4.Monitor tension.
5.Reduce speed approaching bends or transitions.
6.Stop immediately if abnormal resistance appears.
For long pulls, a controlled mechanical pulling system is generally preferable to trying to generate high force manually. OSHA identifies mechanical wire pullers as a method for reducing manual pulling force and associated ergonomic risks.
6. Step 5: Post-Operation Cleaning, Rewinding and Storage
The job is not finished when the cable reaches the target location.
Properly maintaining the fiberglass rodder protects the tool and improves the next installation.
Step 1: Disconnect the Pulling Assembly
After the cable has been successfully installed:
Stop the pulling equipment.
Secure the cable.
Remove the pulling grip according to the manufacturer's instructions.
Disconnect the swivel and pulling rope.
For fiber-optic cable, protect the cable end from dirt and moisture after removing the pulling grip. Corning recommends protecting the exposed cable end and storing slack in a way that prevents damage.
Step 2: Inspect the Rod
As the rod is retracted, inspect it for:
Mud
Sand
Water
Scratches
Cracks
Deformation
Damaged coating
Damaged guide head
Cleaning the rod before rewinding prevents abrasive particles from being trapped against the rod surface.
Step 3: Clean the Rod
For normal dirt:
1.Wipe the rod with a clean cloth.
2.Remove mud and debris.
3.Allow it to dry if wet.
4.Inspect the entire length.
Follow the rod manufacturer's cleaning recommendations, particularly regarding solvents and chemicals.
Avoid aggressive chemicals unless the manufacturer specifically approves them.
Step 4: Rewind the Rod Evenly
Return the rod to the reel under controlled tension.
Avoid:
Crossed loops
Sharp kinks
Loose coils
Rod overlap outside the reel
Excessive side loading
A neatly wound rod is easier to deploy during the next installation.
Step 5: Store the Rodder Correctly
Store the reel:
In a dry location
Away from unnecessary UV exposure
Away from chemicals
Protected from heavy impact
In a position that prevents frame deformation
Before the next job, perform another visual inspection.
7. Pro Tips for Narrow Ducts, Bends and Long-Distance Pipeline Cable Laying
Different routes require different techniques.
Tip 1: Narrow Ducts — Choose Flexibility Before Maximum Strength
For narrow conduits, a very large rod can be counterproductive.
Choose a rod diameter that can comfortably pass the conduit and negotiate the route's bends.
Before installation, verify:
Rod diameter
Duct internal diameter
Minimum bend radius
Guide-head diameter
Route obstructions
A smaller rod may be easier to feed, while a larger rod may provide greater pushing stiffness.
The best choice is the one that balances both.
Tip 2: Use a Pilot Rod for Difficult Routes
For particularly complicated duct systems, consider a staged installation:
Small pilot rod → pulling line → larger pulling rope → final cable
This can be more effective than forcing a large rod through the entire route.
It also allows the team to confirm that the route is passable before committing the final cable.
Tip 3: Protect Sharp Duct Entrances
Sharp edges can damage both the rod and cable.
Use suitable duct guides, bushings or rollers.
This becomes especially important when the cable is being pulled under tension.
Tip 4: Plan Bends Before Pulling
Do not discover a difficult bend after the cable has already entered the duct.
Identify:
90° bends
Manhole transitions
Vertical rises
Tight offsets
Duct junctions
Cable-entry points
FOA guidance emphasizes maintaining the cable's specified bend radius during installation because excessive bending can damage fiber-optic cable.
Tip 5: Use Lubrication Strategically
For long pulls, apply compatible pulling lubricant according to the cable and lubricant manufacturer's recommendations.
Lubricant is especially useful near:
Conduit entrances
Long straight sections
Major bends
High-friction transitions
The purpose is to reduce friction—not to compensate for a blocked or damaged duct.
If the rod or cable stops because of an obstruction, adding more lubricant will not solve the underlying problem.
Tip 6: Use a Reel Stand for Large Cable Reels
Large cable reels should rotate smoothly.
A poorly supported reel can create additional pulling resistance and cable twisting.
The FOA recommends appropriate lifting equipment or multiple trained installers for moving larger fiber-optic cable reels and emphasizes careful reel handling.
Tip 7: Do Not Exceed Cable Pulling Limits
The fiberglass rod may have a high mechanical capacity, but that does not mean the cable can withstand the same force.
Always check the cable manufacturer's:
Maximum pulling tension
Minimum bend radius
Recommended pulling grip
Lubricant compatibility
Installation method
For fiber-optic cables, the cable's allowable tension is the controlling parameter.
Tip 8: Use Mechanical Pulling Equipment for High-Load Jobs
A fiberglass duct rodder is primarily a duct-access and pulling-line installation tool.
It should not automatically be treated as a replacement for a calibrated mechanical cable puller.
For heavy power cables, long-distance pulls, or installations with high predicted tension, use an appropriately rated mechanical pulling system.
OSHA recommends mechanical pulling equipment to reduce excessive manual force in demanding cable installations.
8. Troubleshooting: How to Handle a Stuck Rod Midway in an Underground Manhole
A stuck fiberglass rod is one of the most common problems during underground duct work.
The worst response is usually:
“Push harder.”
Instead, stop and diagnose the problem.
Problem 1: Rod Stops Suddenly
Possible Causes
Debris
Damaged duct
Tight bend
Existing cable
Collapsed conduit
Misaligned duct transition
Guide head caught on an obstruction
Recommended Response
1.Stop pushing.
2.Mark the approximate rod position.
3.Communicate with the worker at the opposite end.
4.Check whether the rod can move backward.
5.Inspect the duct entrance and accessible manhole.
6.Determine whether the obstruction corresponds to a known bend or transition.
7.Attempt controlled withdrawal.
8.Inspect the rod if removed.
Do not repeatedly apply high force.
Problem 2: Rod Moves Forward but Cannot Be Retracted
This can indicate that the guide head has passed a difficult obstruction or become caught.
Try:
1.Stop forward movement.
2.Apply gentle reverse force.
3.Keep the rod aligned with the duct.
4.Avoid sharp lateral bending.
5.Communicate with the opposite worker.
6.If accessible, inspect the rod at the opposite manhole.
If the rod cannot be safely recovered, follow the manufacturer's procedure rather than applying uncontrolled force.
Problem 3: Rod Gets Stuck Near a Manhole Transition
A manhole can create a complicated geometry where the rod exits one duct and needs to enter another.
Check:
Duct alignment
Guide-head orientation
Sharp concrete edges
Internal duct offset
Water or debris
Existing cables
OSHA specifically requires duct rods to be installed in the direction presenting the least hazard and requires an employee at the far end of the duct line for certain underground electrical work.
Problem 4: Rod Breaks
If a fiberglass rod breaks inside the duct:
Do not immediately send another large rod into the same pathway.
First determine:
Where it broke
Why it broke
Whether a section remains in the duct
Whether the duct itself is damaged
Whether the rod diameter was appropriate
Whether excessive force was applied
Whether the bend radius was too tight
A replacement rod may not solve the underlying problem.
If the duct is damaged or blocked, the route itself may require repair.
Problem 5: Cable Becomes Stuck After the Rod Pull
If the rod successfully installs the pulling line but the final cable becomes stuck, the problem is probably no longer the fiberglass rod.
Possible causes include:
Cable diameter too large
Excessive conduit fill
Insufficient lubrication
Tight bend
Cable twisting
Pulling grip problem
Excessive pulling tension
Cable jacket friction
Duct obstruction
For fiber-optic cable, check the manufacturer's tension and bend-radius requirements before continuing.
FOA and Corning both emphasize avoiding excessive bend radius reduction and controlling pulling tension during fiber-optic installation.
Underground Cable Pulling: Quick Field Checklist
Before starting the job, the crew can use this simple checklist.
Duct
Duct route verified
Duct diameter confirmed
Bends identified
Obstructions checked
Duct entrance protected
Fiberglass Rodder
Correct rod diameter selected
Rod inspected
Guide head checked
Reel aligned
Reel operates smoothly
Pulling Accessories
Pulling rope selected
Pulling grip compatible with cable
Swivel installed where required
Lubricant confirmed compatible
Tension-monitoring equipment prepared if required
Safety
Work area barricaded
Manhole hazards assessed
Electrical hazards identified
PPE prepared
Communication established
Workers positioned safely
Cable
Cable type confirmed
Maximum pulling tension confirmed
Minimum bend radius confirmed
Cable reel correctly positioned
Cable pulling route confirmed
Conclusion: A Better Rodding Process Means a More Predictable Cable Pull
A fiberglass duct rodder is more than a simple push-and-pull tool.
Used correctly, it provides a controlled way to establish a pulling path through underground conduits before the final cable installation.
The basic workflow is straightforward:
Inspect → Align → Feed → Connect → Pull → Clean → Store
But professional results depend on the details.
The rod must match the duct and route. The reel must be properly aligned. The rod should be fed with controlled force. The cable must be connected using an appropriate pulling grip and swivel. Pulling tension must remain within the cable manufacturer's limits, and suitable lubrication should be used when required.
For difficult underground routes, the most important principle is:
When resistance increases unexpectedly, stop and diagnose the route instead of simply increasing force.
This approach reduces the risk of rod damage, cable damage and installation delays while making underground cable pulling more consistent and manageable.
For telecom, FTTH, electrical and utility contractors, a properly selected fiberglass duct rodder can serve as the critical first step in building a safe and efficient cable-pulling system.